

Hi, hosting with playit has become easier with recents changes and updates, however many people including me were only able to host «simple game servers» (those that only use a single port) or the ones that are pre-configure in the playit platform itself, this tuto will try to guide trought hosting a game that uses more ports, in this case ARK Survival Evolved, lets get started.
Well, we will assume that:
- You already tried your server over lan and you successfully joined it. This tuto will try to to show you the steps needed in order to get your ark server publicly accessible.
- You are using ASM (ark server manager).
- You already have a playit account.
- You have Steam and ARK already installed.
- You have connected/linked your computer to playit.gg services and able to access your tunnels with the playit official app.
- You have already tested, or hosting a server for a simple game, like terraria/tshock or factorio (and you know that your stuff is working).
- You will join you server using Ark over steam (not sure if ark from epic will work, haven’t tried it).
Disclaimers:
- If you mess up your ark config, not my fault.
- If the electricity goes down in your area, not my fault.
- If your computer suddently explodes, not my fault.
- If the tuto tells you that you set your computer on fire, a little my fault.
- If the tuto annoys you because of grammar faults, a little my fault, sry not native english speaker, lol.
Issues I faced or know issues:
Well, the server will not show up in the ark «non oficial servers», however you will be able to access it if you add the server as favorite in steam (final step).
Sometime the server won’t show in your favorites list (you just click update and it should show up again).
Go for it:
First I will show you my ASM config
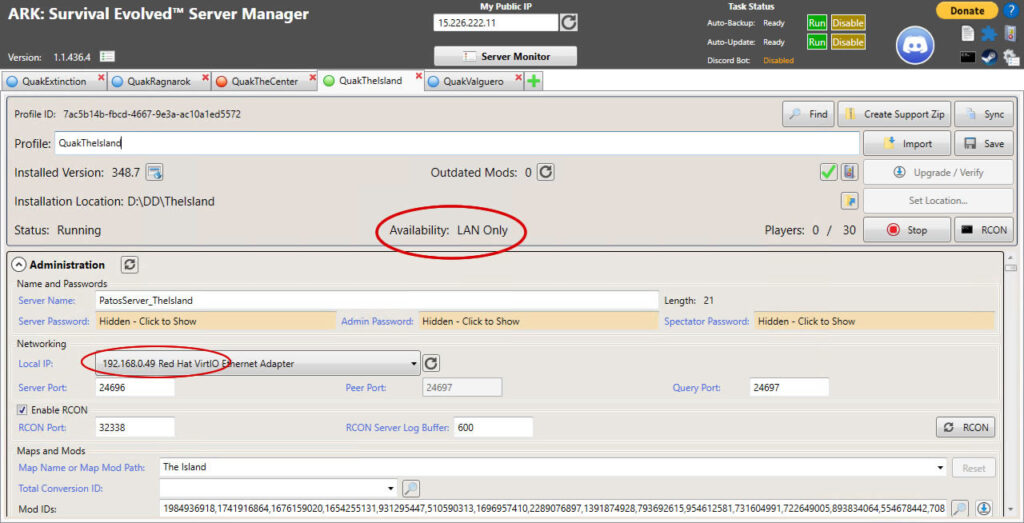
You will obviously have a different Local IP and btw ignore the My Public IP (you won’t need that).
Also note; The Server Port: 24696 and my Query Port: 24697 Yours will be different probably 7777 and 27015.
Please note that in the «Networking» area in the Option «Local IP» you should specify your device (this to avoid potential issues later).
Next you need to go to your playit platform.
Select the Tab «Tunnels».
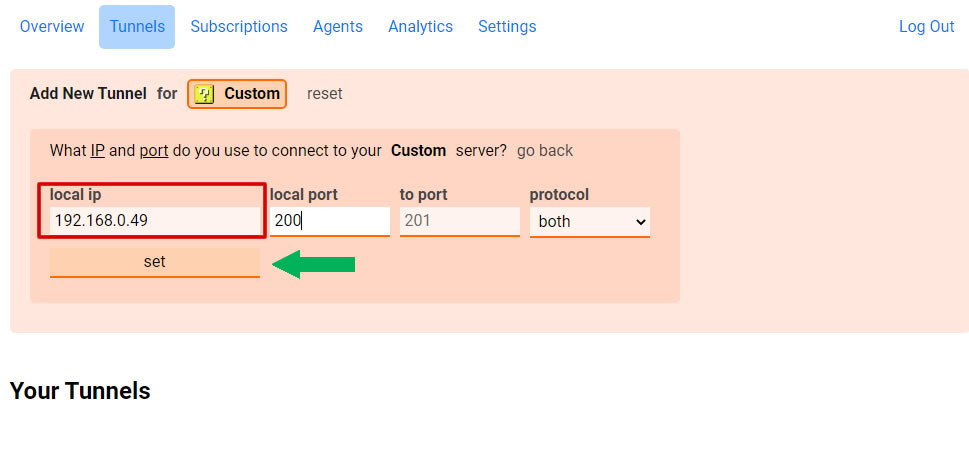
As showed in the picture above, you need to put in the «local ip» field your local ip address (the one where your server is being hosted) in my case it’s on 192.168.0.49 like you saw in the very first screenshot.
Then in the local port you can put whatever you like, in the example I’ve put 200-201 and as protocol select both (just to avoid conflicts). Click on SET.
Following the clicking in SET you will end up with something like this:
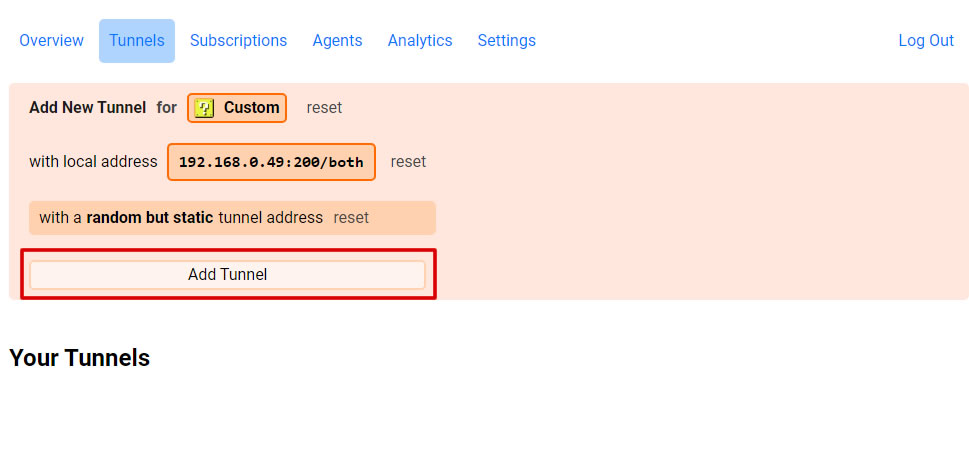
Click on Add Tunnel.
You will then need to click on edit the tunnel you’ve just created.
Coming next as the following screenshot shows.
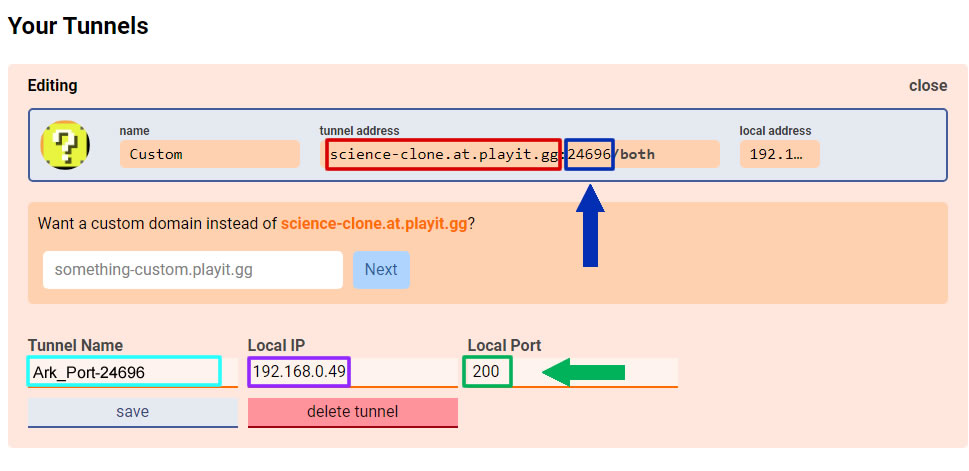
In the image above show in colors the following in details:
- In red, a random «dns name» in this case science-clone.at.playit.gg
- In blue, a random port provided by playit.
- In cyan, the name you optionally can give to this tunnel so you keep track of it, in this case «Ark_Port-24696».
- In purple, the port of the local machine that is hosting your server in this case 192.168.0.49.
- In green, the port you previously defined (in this case 200).
So knowing all of this you need to change the Local Port (the one green squared).
You need to change it with the port that playit randomly gave you (the one blue squared), in this case 24696.
You can also put a name to your tunnel (cyan squared)
Make sure you set your server Local Ip address (purple squared).
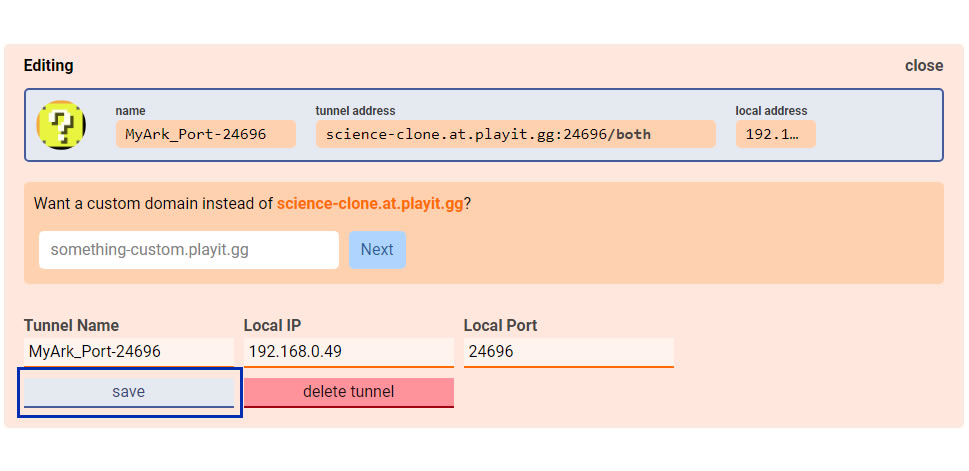
When you are done editing you should get something similar to the image above.
Then click «SAVE».
Next, you need to do all the above steps one more time (for ark you need at least two tunnels) so you end up with something similar to the picture below:
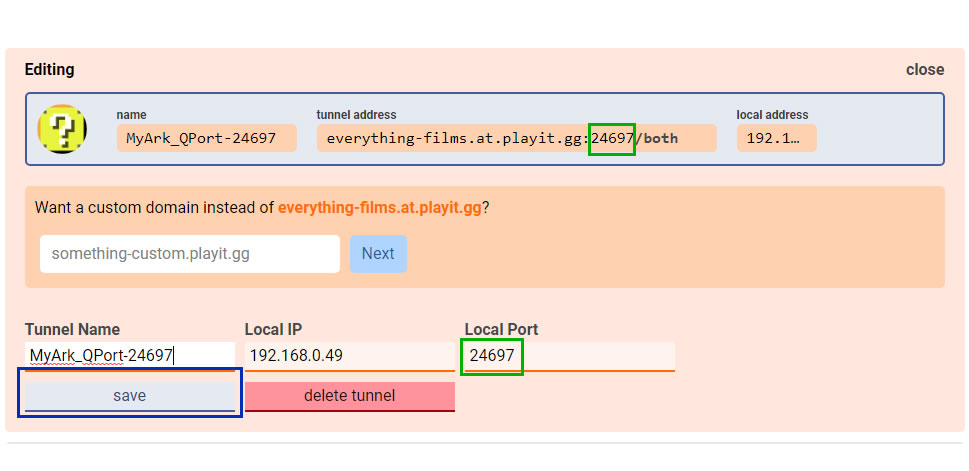
The picture above shows my second tunnel (already edited and named), you should get something similar.
In this case I named it MyArk_QPort-24697 (this will be our query port for ark), in green squared the port is already edited reflecting the one playit gave me.
Click SAVE.
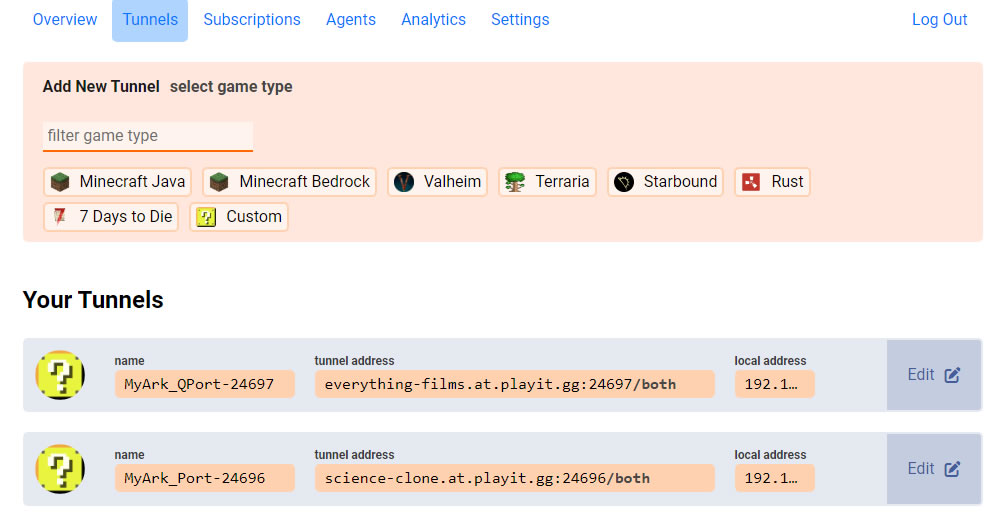
You will end up with something similar as the image above, you will need this two tunnels.
Keep track with the last tunnel you’ve created in this case: everything-films.at.playit.gg:24697
Now lets go back to your ASM.
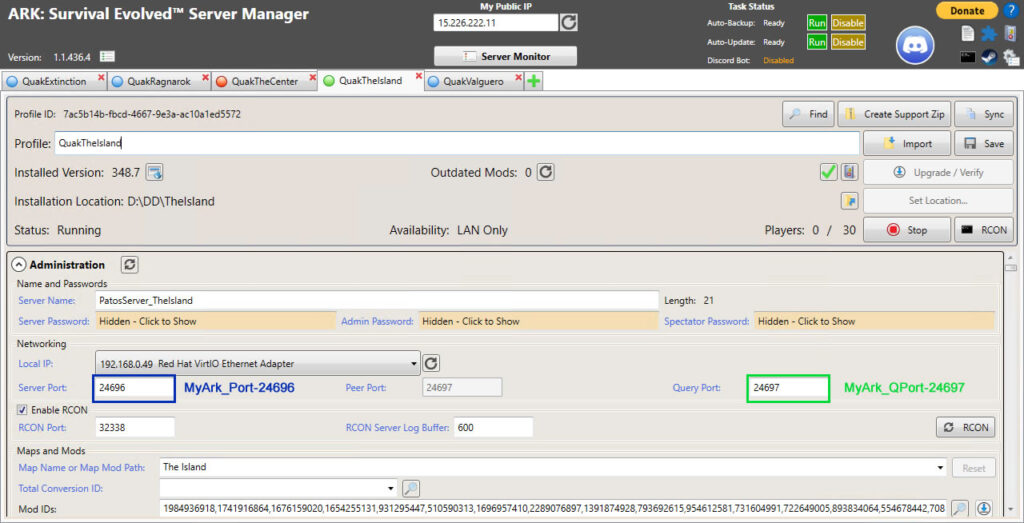
In the image above I’ve changed the default ports in ASM for the ones I’ve got in playit.
In blue squared I have 24696, I’ve changed the default 7777 for it.
In green squared I have 24697, I’ve changed the default 27015 for it.
As reference in the image. I’ve added a description with the names I’ve put in the playit tunnels.
Save your ASM config.
Stop your ark server, then start it again, until your ASM looks similar to the one showed in the picture above (accessible from Lan Only), make sure edited your ports, ignore the RCON (if you don’t need it).
Finally all you need is the dns name provided by playit, in this case the port that is used to access ark is 24697 (green squared), you need to look back at your playit platform and look for the tunnel that has this port, in this case it is, everything-films.at.playit.gg:24697.
Accessing your Server through Steam:
You will need to go to the tab View, then Servers.
Following you will end up with the Servers section of steam, go to the Favorites tab, then click on Add a Server.
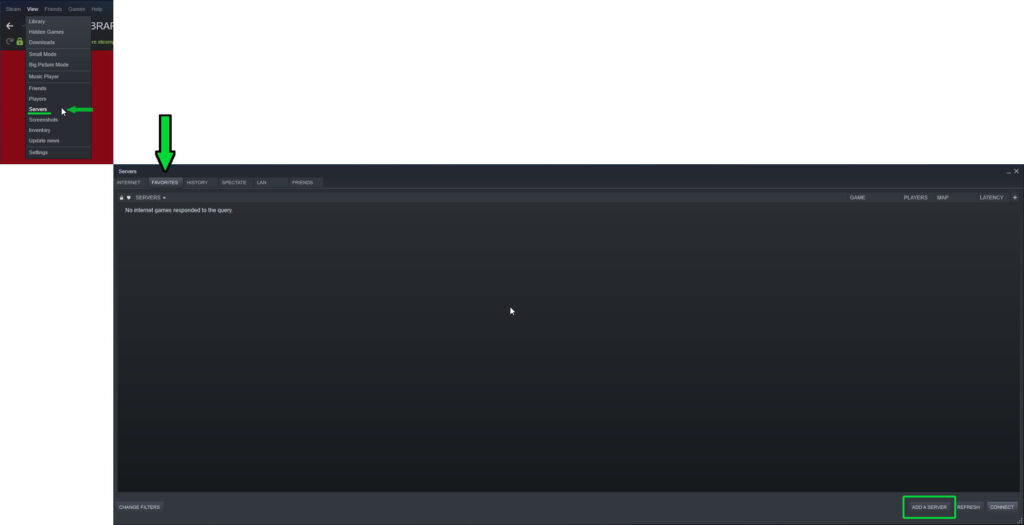
Finally you need to add your dns name followed by the query port as the picture below shows:
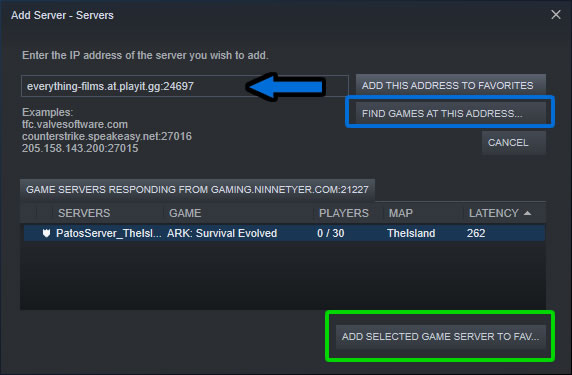
Click on Find Games at This Address, make sure your servers shows up, then click on Add Selected game server to Favorites.
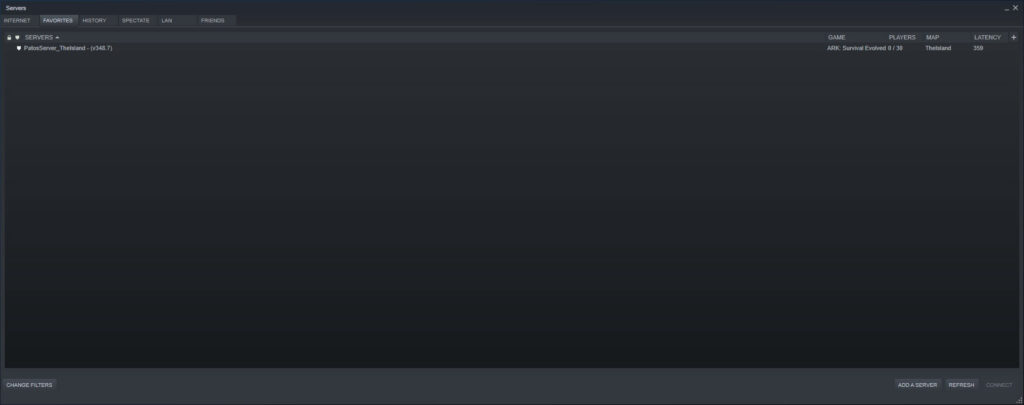
Will will end up with something similar to the image above.
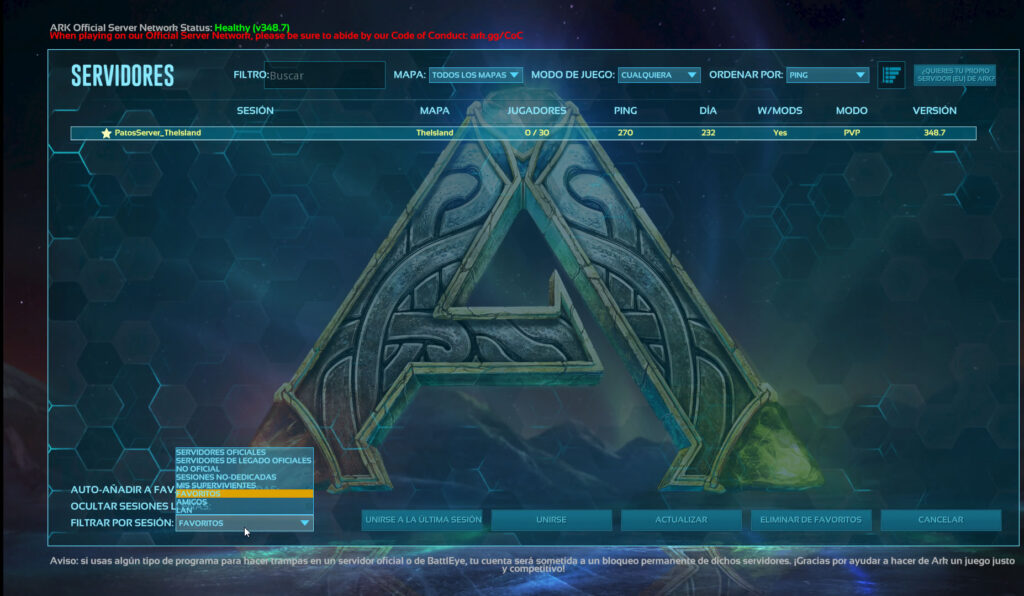
In the game, you need to change from Oficial/Non Oficial Servers, to Favorites, so your server will show up there, then click JOIN.